
Part of the “AI-Native Game Development” series. The June kickoff post named “converting FPS into TPS” as the first thesis to validate in Phase Two, and promised to “record completion as completion, and setbacks as setbacks.” A month and change later, it’s done — these two posts are the delivery record.
1. What This Record Is About
The TPS camera, unpacked, is two domains: space and time.
The spatial domain (placement and framing): where the camera sits and what the frame shows. Arm length, shoulder offset in centimeters, how much of the frame the character occupies, where the horizon line falls. Every one of these directly decides whether the game *looks* professional.
The temporal domain (transitions and rhythm): how long state transitions take, and with what rhythm. How fast the push-in on aim, whether ADS is a hard cut or an ease, how the frame settles on a sudden stop. These decide whether the game *feels* responsive.
Part 1 covers the spatial domain; Part 2, the temporal. But before the details, the thesis both posts orbit around:
Experience = Function × Data ← Measurement.
There’s a boundary in that equation that’s easy to misread, so let me draw it first: it straddles two different worlds.
- At runtime, there are only two layers. Function (mechanism, no taste): the three-stage rig state machine, the aim-layer blender, the transition timers, the follow spring; each is a “channel” that carries no numeric judgment of its own. Multiplied by Data (the numbers, all externalized): composition tables, baseline configs, spring parameters, a rack of console variables, all designer-editable and per-weapon. When the game runs, that’s it. No third layer.
- Measurement is not a runtime layer; it lives in the development pipeline. Measure → calibrate → data: read the reference footage to get a target value, invert it into engine parameters, then bake the result into the data layer. It’s an assembly line that translates “the feel I want” into “a number in a table,” and once it delivers, it exits. It never ships.
Splitting function from data is old engineering news. What’s new is that measurement line: where “matching the feel” used to mean a veteran sitting at the machine tuning by gut, this time it ran on a batch of reference recordings, frame-by-frame reads, and a set of measurement instruments written on the spot — turning “does it look right” into “off by how many percentage points.” Every number that entered a table has a provenance. This is one of the three roles the kickoff post assigned to AI, made concrete: “reference alignment, machine sampling, human evaluation.”
Where AI sits in each of these layers, and where humans are irreplaceable — that evidence chain runs through both posts and gets collected at the end of Part 2.
2. Blueprint vs. Reality: Reconciling With the May Post
One thing to settle before we start. In mid-May we published a TPS camera post — system archaeology, design principles, a seven-step plan. A month of actual work later, the real path doesn’t line up with that blueprint. Pretending the post never existed would be easiest, but this series promised to record honestly, and “the gap between blueprint and reality” is precisely what’s worth recording about AI-native development. So: reconciliation, line by line.
What held up:
- The spring-arm + data-driven direction. The three-stage rig ended up stacked exactly on that per-movement-state baseline config, and went further — composition, timing, FOV all made it into a per-weapon CSV table.
- The five design principles. Especially the anti-nausea rule (rotation never gets lag) — later confirmed by the benchmark’s turn footage: zero rotational latency, our principle and its implementation in full agreement.
- The value of “AI understanding systems.” The later four-layer recoil configuration chain and the fire-shake gating investigation are both archaeology wins. That thesis stands.
What reality corrected:
- Seven-step linear plan → measurement-driven loop. May’s plan was seven steps in a line. The real path is a loop: capture reference footage → frame read → set a value → land it → get rejected by playtest → correct. The word “footage” doesn’t appear in that plan — yet footage became the authority behind every number. The most important thing in a plan is the thing you don’t yet know you’ll need.
- “Understanding the system” wasn’t enough; you also had to “measure the target.” May’s post carried a hidden assumption: understand the structure and you can tune the feel. The actual lesson: the feel gap is entirely in the numbers, and without quantifying it, you can’t even say *where* the gap is. Understanding the system only answered “what can I change”; quantified reference answered “change it to what.”
- Specific designs got overturned. That post presented a set of asymmetric 0.1s / 0.6s transition times as a case study; they were wholesale replaced by a measured 0.20 / 0.25 / hard-cut scheme (details in Part 2). And the modifier stack it spent pages cataloging barely got touched — the real battleground was the spring-arm layer and the data tables.
The better question: why couldn’t we see this at the time? When May’s blueprint was written, there wasn’t a single frame of reference footage and not one read tool existed — “quantified alignment” cost approximately infinity back then, so the methodology naturally slid toward the cheapest path: read code, reason, write a plan. The turning point wasn’t someone having an insight — it was that the cost of measurement got knocked down: AI compressed frame extraction, grid overlay, per-frame reads, and curve fitting — days of specialist work — into a few rounds of conversation. Measurement went from luxury to daily commodity, and the blueprint method retired itself. The cost structure of the tools changed, and the methodology followed — this may be the most fundamental rule of AI-native development.
The bottom line of this reconciliation:
A blueprint tells you where to measure; measurement is the authority on what to finalize. May’s post understood the system, these two understood the target — and between them sits a quantitative reading toolkit.
3. The Three-Stage Rig: Three States
The skeleton first. The reworked camera is a three-stage rig:
- Hip (default): over-the-shoulder, camera pulled back, wide view (the observation stance);
- Shoulder (hold RMB): camera pushes in fast, character shifts to one side of the frame, crosshair centered (the engagement stance);
- ADS (middle mouse, scope): reuses the existing first-person sight view (the precision stance).

One key structural trade-off: ADS is not a fake third-person scope-hug, but a direct reuse of the project’s mature FPS scoping path. The spring arm only manages the hip and shoulder compositions; during ADS it retreats backstage as a “fallback base.” That decision saved an entire round of duplicated camera detail work — and left a hidden hazard, which Part 2 unpacks when it gets to the ADS hard cut.
Three states, two playable spring-arm slots, plus a reused FPS scope — that’s the skeleton. The hard part isn’t “which three states exist,” it’s “how the player moves between them,” and that gets its own section.
4. The Input Model: Two Rewrites in One Day
A state machine looks clean on paper; landing it on a gamepad and mouse becomes a different problem — one that had us tear up two designs in a single day, each of which looked airtight until it was torn up. It’s worth recording in full because it proves something counterintuitive: how you switch between states is a product-model problem, not a code problem — the code part never failed; what failed was every guess about “what the player wants.”
Version 1: “source latch.” The logic was tidy: middle-click into scope, the system remembers “did you come from hip or shoulder,” and returns you the way you came. Clean state machine, easy code, done in an afternoon. The first playtest exposed it: the player’s expectation of “where to exit to” has nothing to do with “where they came from”: a player who scoped directly from hip still has RMB held down on exit, and clearly expects to return to shoulder to keep fighting, not to be “latched” back to hip. The designer’s-eye symmetry is, from the player’s eye, baffling.
Version 2: RMB toggle. Switched to click-to-aim / click-to-lower, middle-click simplified accordingly. It surfaced a deeper problem: the feel was non-reproducible — the same inputs, smooth today, sticky tomorrow. Half a day of digging traced it to a player setting hiding “click-scope / hold-scope” as two modes, with every aim-input behavior in the project drifting on that setting. Bindings we tuned in mode A ran as mode B on the user’s machine — two people could never test the same feel. Worse, when switching state programmatically, a synthesized key event means something entirely different in click mode: “release” is a no-op there, and one automation path silently jammed in the scoped state as a result.
The final version: three hard rules. RMB hold-to-aim, nailed down: the scoping method is fixed in code, no longer reading the player setting, killing that hidden dimension for good; middle-click is a mode toggle with memory: active only while aiming, shoulder⇄ADS switching live, and the system remembers your last choice: players who like the scope go straight to it on every aim, players who like the shoulder stay there forever; releasing RMB always returns to hip, mode memory not cleared. Plus one staging rule: middle-clicking to scope directly from hip doesn’t cut instantly to the scope — it shoulders the weapon fast, pushes in, then snaps to the scope on arrival. The timing calibration of that is a Part 2 story.
🔧 Design retro · Input model: why is tearing up two versions in one day worth writing? Because the two failures died at different layers. Version 1 died of the mismatch between designer intent and player expectation, a state machine’s symmetry not being product logic. Version 2 died of a hidden dimension, a global setting making the feel non-reproducible, and a non-reproducible feel cannot be iterated at all. Each of the final three rules came from a real failure. Compressed to one line: don’t write exit logic before the input model is settled — code that depends on the model is void the moment the model is overturned. Plus an automation lesson: programmatically changing aim state must go through a direct internal-state-machine call; synthesized key events drift in meaning across player settings, a time bomb in any automation pipeline.
5. Transitions Aren’t Cuts: The Timed Blender
The three-stage rig covers “which states exist,” but how you switch between them is another matter — and the highest-craft piece in this spring-arm rework. It sits between space and time: *what* it blends (composition values) belongs to the spatial domain, *how long* it blends belongs to the temporal, so it goes here as the bridge, with the exact seconds left for Part 2.
The first implementation was a cut: the instant you aim, the shoulder composition offsets take effect. In-game it looked too hard, the frame *snapping* to the new position like an edit, not a camera move. A real camera move has a process: the camera glides smoothly from the hip position to the shoulder position over a fraction of a second.
So there’s a timed blender that eases the aim-layer offsets from “current value” to “target value” instead of replacing them. Sounds simple; getting it right had three pitfalls, each forced out by playtest:
One, continue rather than stack. Rapid repeated RMB presses (aim—lower—aim) are normal. If every keypress kicks off a new “zero to full” blend, the blends stack and the frame stutters. The right move: on every target change, continue from the current mid-value: pushed in halfway then released, glide back from that half, no restart, no stacking. What the blender records is “how far the actual value is from the desired one,” compared every frame, resumed on change.
Two, three transitions, three durations. Into shoulder, out of shoulder, and posture-group switches within shoulder (stand→crouch) are three distinct transitions and should differ in speed. The blender picks the matching duration by “from where, to where” (in, out, retarget). What those seconds are and how they were counted out of the reference footage is Part 2’s main event; here, just note that the structure left three independent knobs.
Three, snap on convergence. The old exponential-approach problem: a blend approaches the target infinitely but never reaches it, so you have to snap to the target value once close enough. Otherwise a tiny persistent drift remains, and a static frame looks like the camera is faintly breathing.
🔧 Design retro · Why not reuse the existing tween: the project already had a tween system, but it was built for UI animation (object-oriented, delegate callbacks), too heavy to hang on the per-frame core camera path. The blender ended up on the engine-standard alpha-blend primitive — “reuse what exists” and “use the right tool” are two different things; the former saves effort, the latter saves runtime cost. That “don’t reuse” decision was itself an archaeology pass: pull all the candidates in the project (tween system, UI animation, engine primitive) and compare them before you dare conclude. This exhaustive comparison is exactly AI’s strength — list everything usable, let the human judge which is right.
This blender has a later payoff, collected in the FOV section: it blends not just position: the field-of-view offset that came later hangs on the same blend timeline, same alpha, same continue logic, position and FOV synced frame by frame. A channel designed right grows unplanned reuse.
6. Build the Ruler First: The Tuning Panel and the Data Pipeline
Before tuning any numbers, we spent two batches building two rulers. In hindsight, this was the highest-ROI investment in the whole placement-and-framing effort.
Ruler one: a runtime tuning panel. A pure-code, zero-art-asset debug panel that hangs in-game showing the live camera parameters, with a shoulder 3×3 grid (three postures × arm/shoulder/lift), a baseline row, transition-duration knobs, and one-click export.
The panel is itself a small “AI-native development” sample. The project’s existing debug-panel template turned out to be art-asset-plus-code-binding: every panel needs a UI asset, and changing layout means opening the editor. But continued archaeology found a precedent for building UI purely in code, the whole panel assembled in code with zero asset dependency. We did the latter, and the payoff was immediate: every panel-layout tweak (columns, locks, readouts added over seven or eight rounds later) was a pure-code commit, touching no art asset, version control kept clean.
The panel’s detail designs were each forced out by a real pain point: the baseline row follows movement state: you crouch, the panel auto-switches to the crouch-baseline row, no manual selection (version 1 required manual selection, and tuning crouch I edited the standing values, one round wasted); hold-to-preview lock: holding the button pins the aim layer to shoulder and releasing restores it, curing “the parameter has to be seen in the aiming state, but the right hand holds RMB and the left works the panel, not enough hands”; export to log: one click dumps all current parameters into paste-ready format, killing hand-copying.
Why not the engine’s built-in property panel? Because the iteration-loop length is entirely different: the property panel means stop the game, find the component, change the value, re-enter — minutes a round; the tuning panel is look-and-dial in the aiming state — seconds a round. Every number convergence in the placement-and-framing work below had its last mile done on this panel.

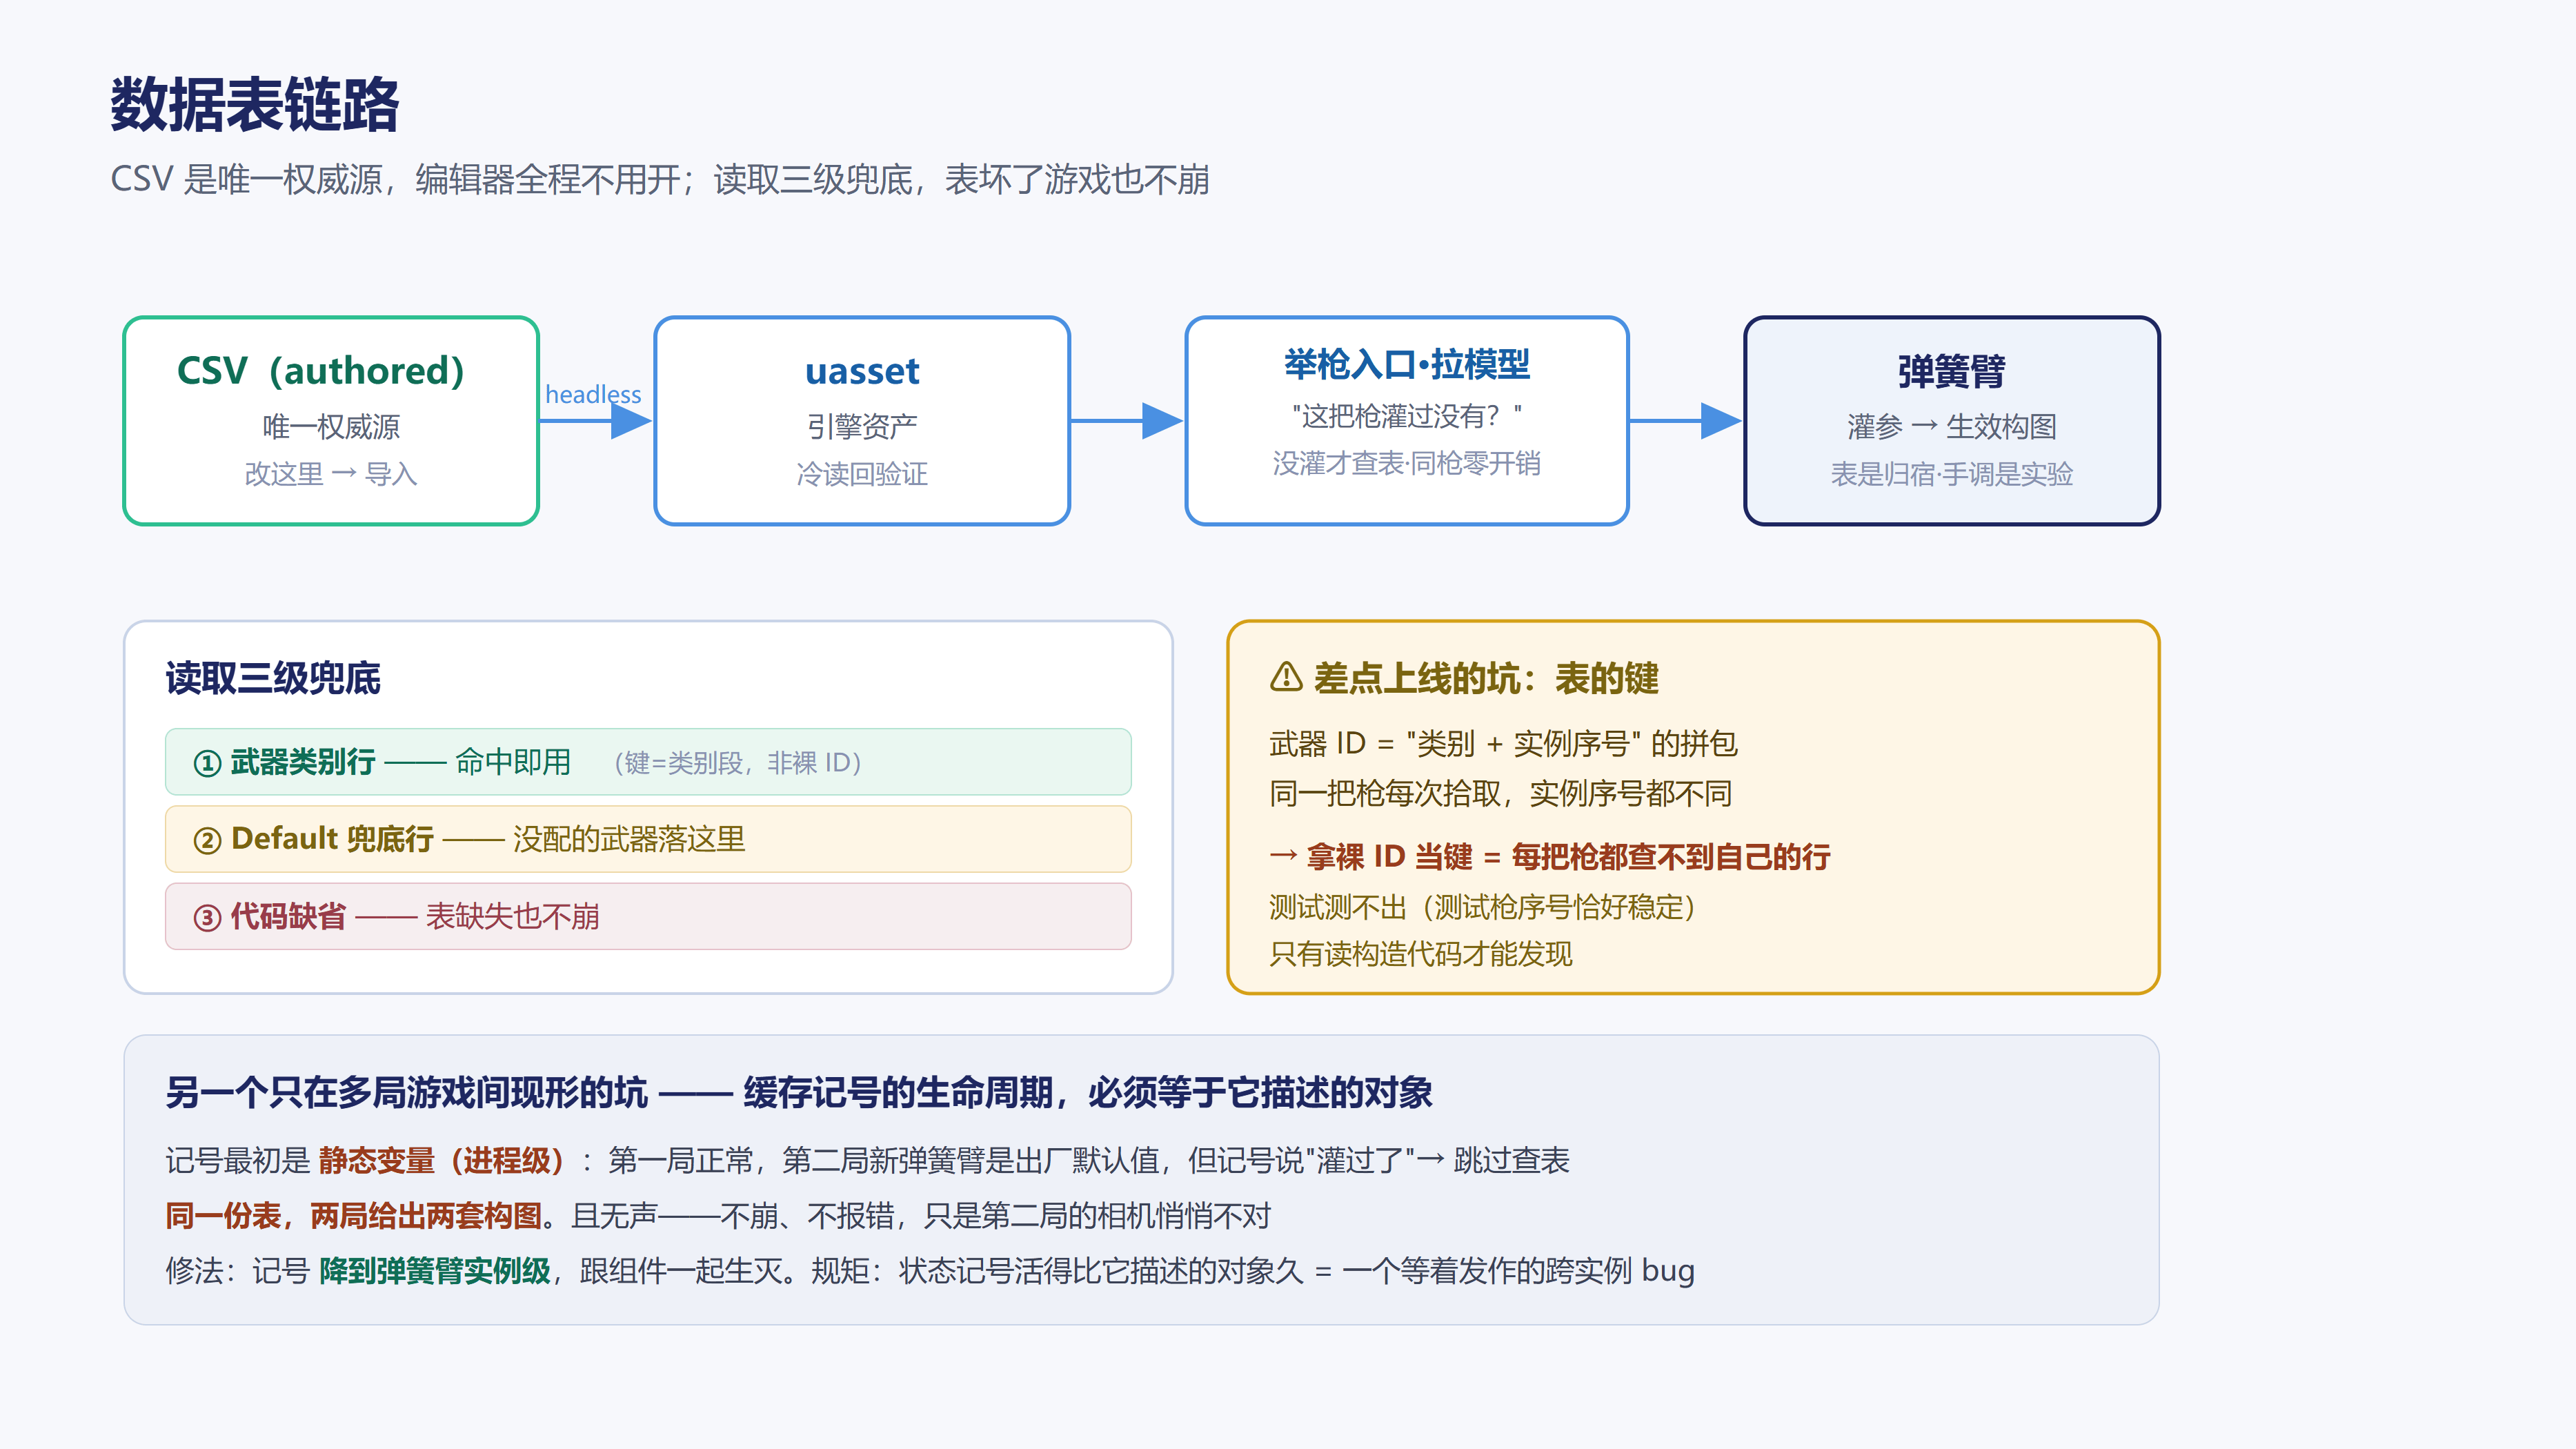
Ruler two: the data-table pipeline. Composition parameters went into a per-weapon CSV: nine shoulder-offset columns across three postures, three per-posture safety clamps, several timing columns (FOV joined later). Plus a workflow: CSV is the single source of truth, one command headless-imports it into the engine asset, another cold-reads it back to verify — the editor never has to open.
This granularity was chosen deliberately: the current stage is one row per weapon class (all instances of the same gun share one composition row). That’s enough for this stage, but plainly not the endpoint — attachments, posture combos, sight types may all need independent config, and those are the natural sub-division dimensions of this table structure, add-a-column, no teardown. Running the pipeline first at the coarsest granularity is intentional: the finer the granularity, the larger the tuning-iteration load, and what needs validating right now is “does data-driven work as a path,” not “fill every cell.”
And that “weapon class” granularity itself buried a nearly-shipped pitfall: the table key. The weapon ID looks like an integer, taken straight as a key, all tests pass. But writing the code I took one more look at the ID’s construction: it’s a “class + instance-serial” bit-pack, and the same gun picked up twice has a different serial each time. Taking the raw ID as key means every gun you pick up can’t find its own row, silently falling to the default row. The correct key is the unpacked class segment. This pitfall doesn’t show up in testing (the test-map gun happens to have a stable serial); only reading the construction code reveals it.
This pipeline is a slice of a larger effort. To make “CSV as authority” hold project-wide, we did a one-time export baseline of the project’s 1,300-odd data tables: if any table’s asset and CSV ever drift, one comparison finds who moved it. That baseline effort also inventoried a dozen-plus corrupt tables and a few structurally non-serializable ones — silent wounds no one knew were sitting in the project.
The read path has three-level fallback: weapon row → default row → code default, so the game doesn’t crash even if the table breaks. For timing, it chose a “pull model”: rather than listening for weapon-swap events, it checks at each aim’s entry point whether “this gun’s parameters have been loaded,” and only queries the table if not: zero cost during the same weapon, and console and panel hand-tuned experimental values don’t get repeatedly overwritten by the table; only a weapon swap reverts to table values. The table is the destination, hand-tuning is the experiment — this priority semantics got relied on in every tuning round afterward.
The cache-token’s lifetime must equal the object it describes. One more pitfall shows up only across multiple game sessions, and needs pulling out separately because it’s far more general than cameras. The “this gun has been loaded” token was originally a static variable — process-level lifetime. First session fine; from the second session on, the newly built spring arm is still at factory defaults, but the static token still says “loaded,” so the table query is skipped — the same table gives two different compositions across two sessions. This bug is insidious precisely because it’s silent: no crash, no error, just the second session’s camera quietly wrong. The fix drops the token from “process-level” to “spring-arm-instance-level,” born and destroyed with the component. The rule, abstracted: whatever a cache token describes, its lifetime should equal that thing: it records “has this spring arm been loaded,” so it must never outlive that spring arm. Anywhere a state token outlives the object it describes is a cross-instance bug waiting to fire.
🔧 Design retro · Why build the ruler first: a counterintuitive fact of AI-native development: AI’s marginal cost of writing tools is so low that “build the instrument before you do the work” goes from luxury to default. This panel and this CSV pipeline together cost about two batches, in exchange for every subsequent numeric iteration dropping from “minutes” to “seconds.” The scale effect cashed out in the composition closure below: six composition cells, two-to-four rounds each — that iteration volume simply can’t run without these two rulers.
7. Reference Measurement: Footage Says “What,” Probes Say “What Is”
Rulers built, next the methodology. The one-line version:
Footage says “what you want,” probes say “what it currently is,” and the difference is what to change.
On the reference side, we recorded fourteen clips of benchmark gameplay off a list. The list wasn’t “record extra, can’t hurt” — each clip had three things written before recording: an action script (e.g., “aim-and-lower five times in place, scope-and-unscope five times, hip-direct-scope three times, crisp actions”), a question to answer (this clip is issuing the birth certificate for transition timing), and a read deliverable (frame-count to get three timing parameters). The difference between recording with a question and “record first, figure it out later” gets magnified tenfold at the read stage — the former gives every clip a clear consumption path, the latter piles up “might be useful” recordings no one ever revisits. The fourteen’s division: three postures × one three-state hold each (composition), a transition-timing clip, run-stop (follow lag), turn (rotation lag), sprint (FOV), dive-roll, fire-and-hit (shake), stratagem call, shoulder swap, multi-weapon comparison. Footage was uniformly extracted into 385 read-frames with grid and timecode.
After recording, a counterintuitive gain: nearly half the read conclusions were “don’t do it.” The dive-roll verdict was “camera stays stable and follows displacement, no dedicated cinematography needed”; the stratagem call was “no special camera behavior, mystery closed”; the turn clip confirmed “rotation lag zero.” Three clips eliminated three imagined workloads — measurement tells you not just how far off, but also where you’re not off, and the requirements the latter cuts are pure profit.
On our side, probes grew in batches: the debug panel’s live readouts, state-machine text, and later a dedicated sampler dropping each frame’s camera data into CSV. The principle: prove the pipeline is healthy before discussing numbers. That principle’s two saves are a Part 2 lag story.
Grid reading is the plainest and most reliable quantification: overlay same-spec grids on the reference frame and our screenshot, read the character helmet’s x-coordinate, width, and relative position to the horizon. Three reads nail down “composition”: x-coordinate maps to shoulder offset, width to arm length, horizon relation to pitch; one read anchors one parameter, no more, no less. The fancy image techniques come later (Part 2’s reading-toolkit evolution), but the workhorse of placement-and-framing reading is these three grid reads.
8. Composition Closure: From Slope Contamination to Formula Inversion
The main event of placement and framing: align three postures × hip/shoulder — six composition cells — to the reference one by one. This section tells the standing-shoulder cell in full, because it walked the whole pit-and-fix of this method.
Round one: absolute target, failed. Read the targets off the reference: “helmet center at x 43%, width 6.6% of screen, helmet 17% below the horizon.” The first two reads converged fine; the third led us astray: the rig tuned to “17% below horizon” had an arm length nearly double the original, camera hoisted high behind the character’s head. In-game: the camera sat at an obviously unreasonable height.
The cause of the failure needs spelling out. In the reference footage the character stands on a slope with the terrain falling away ahead — that “helmet 17% below horizon” read is mostly a false signal contributed by terrain. Our test map is flat. Applying the reference’s on-slope absolute composition directly to flat ground packs the entire terrain difference into the camera parameters. This round was caught by two human eyeball vetoes — “too far,” “too high” — the numerically “converged” solution vetoed on sight.
Round two: relative-delta target. The fix in thinking: within the same clip, the hip segment and shoulder segment share the same terrain and pitch, so take the “shoulder minus hip” delta as the target, and terrain contamination cancels itself out. Keep only helmet width as an absolute (object size is terrain-immune). New target: width 6.6%, x offset relative to hip −1.3%, drop relative to hip +5.2%.
Round three: formula inversion. With a clean target, the next question is how to invert “screen reads” back into “engine parameters.” Dialing the panel toward it works but is slow, and after dialing you can’t say “why this number.” We built a first-order projection approximation model for each of the three reads: not a strict perspective projection (that would solve for FOV, aspect ratio, and camera rotation together), but within the working range of “small angle, fixed FOV, approximately fixed target size,” folding those factors into constants and keeping only the dominant relation:
- helmet width w ≈ C_w / d (d = camera-to-head distance)
- x position x ≈ 50 − 50·SY / d (SY = shoulder offset)
- horizon relation bh ≈ K·(TZ − h₀) / d (TZ = look-target lift)
The three constants C_w, K, h₀ don’t come from a spec sheet — they’re calibrated from two measured screenshots: dial two known parameter sets on the panel, read the screenshots, solve for the constants, and the approximation model is anchored to this working range of our own engine. Then invert the target reads to get a parameter set, two rounds of fine-tuning to land: final width 6.3% (target 6.6, within read noise), x 43.4% (target 42.9), relative drop +6.1% (target +5.2). The approximation model only “turns blind panel-dialing into two directed adjustments”; whether it lands is still judged by measured screenshots.
The finalized value is a set of arm/shoulder/lift offsets; the derived set left in the pre-rework code, run against the approximation model, is wrong in two directions: pushed in too far, and shoulder shift flipped. It was hand-written “looks about right” earlier and never validated by the toolchain. That’s the value of the “measurement layer” in this post’s thesis: without quantification, a wrong parameter can lurk in the project for a long time.
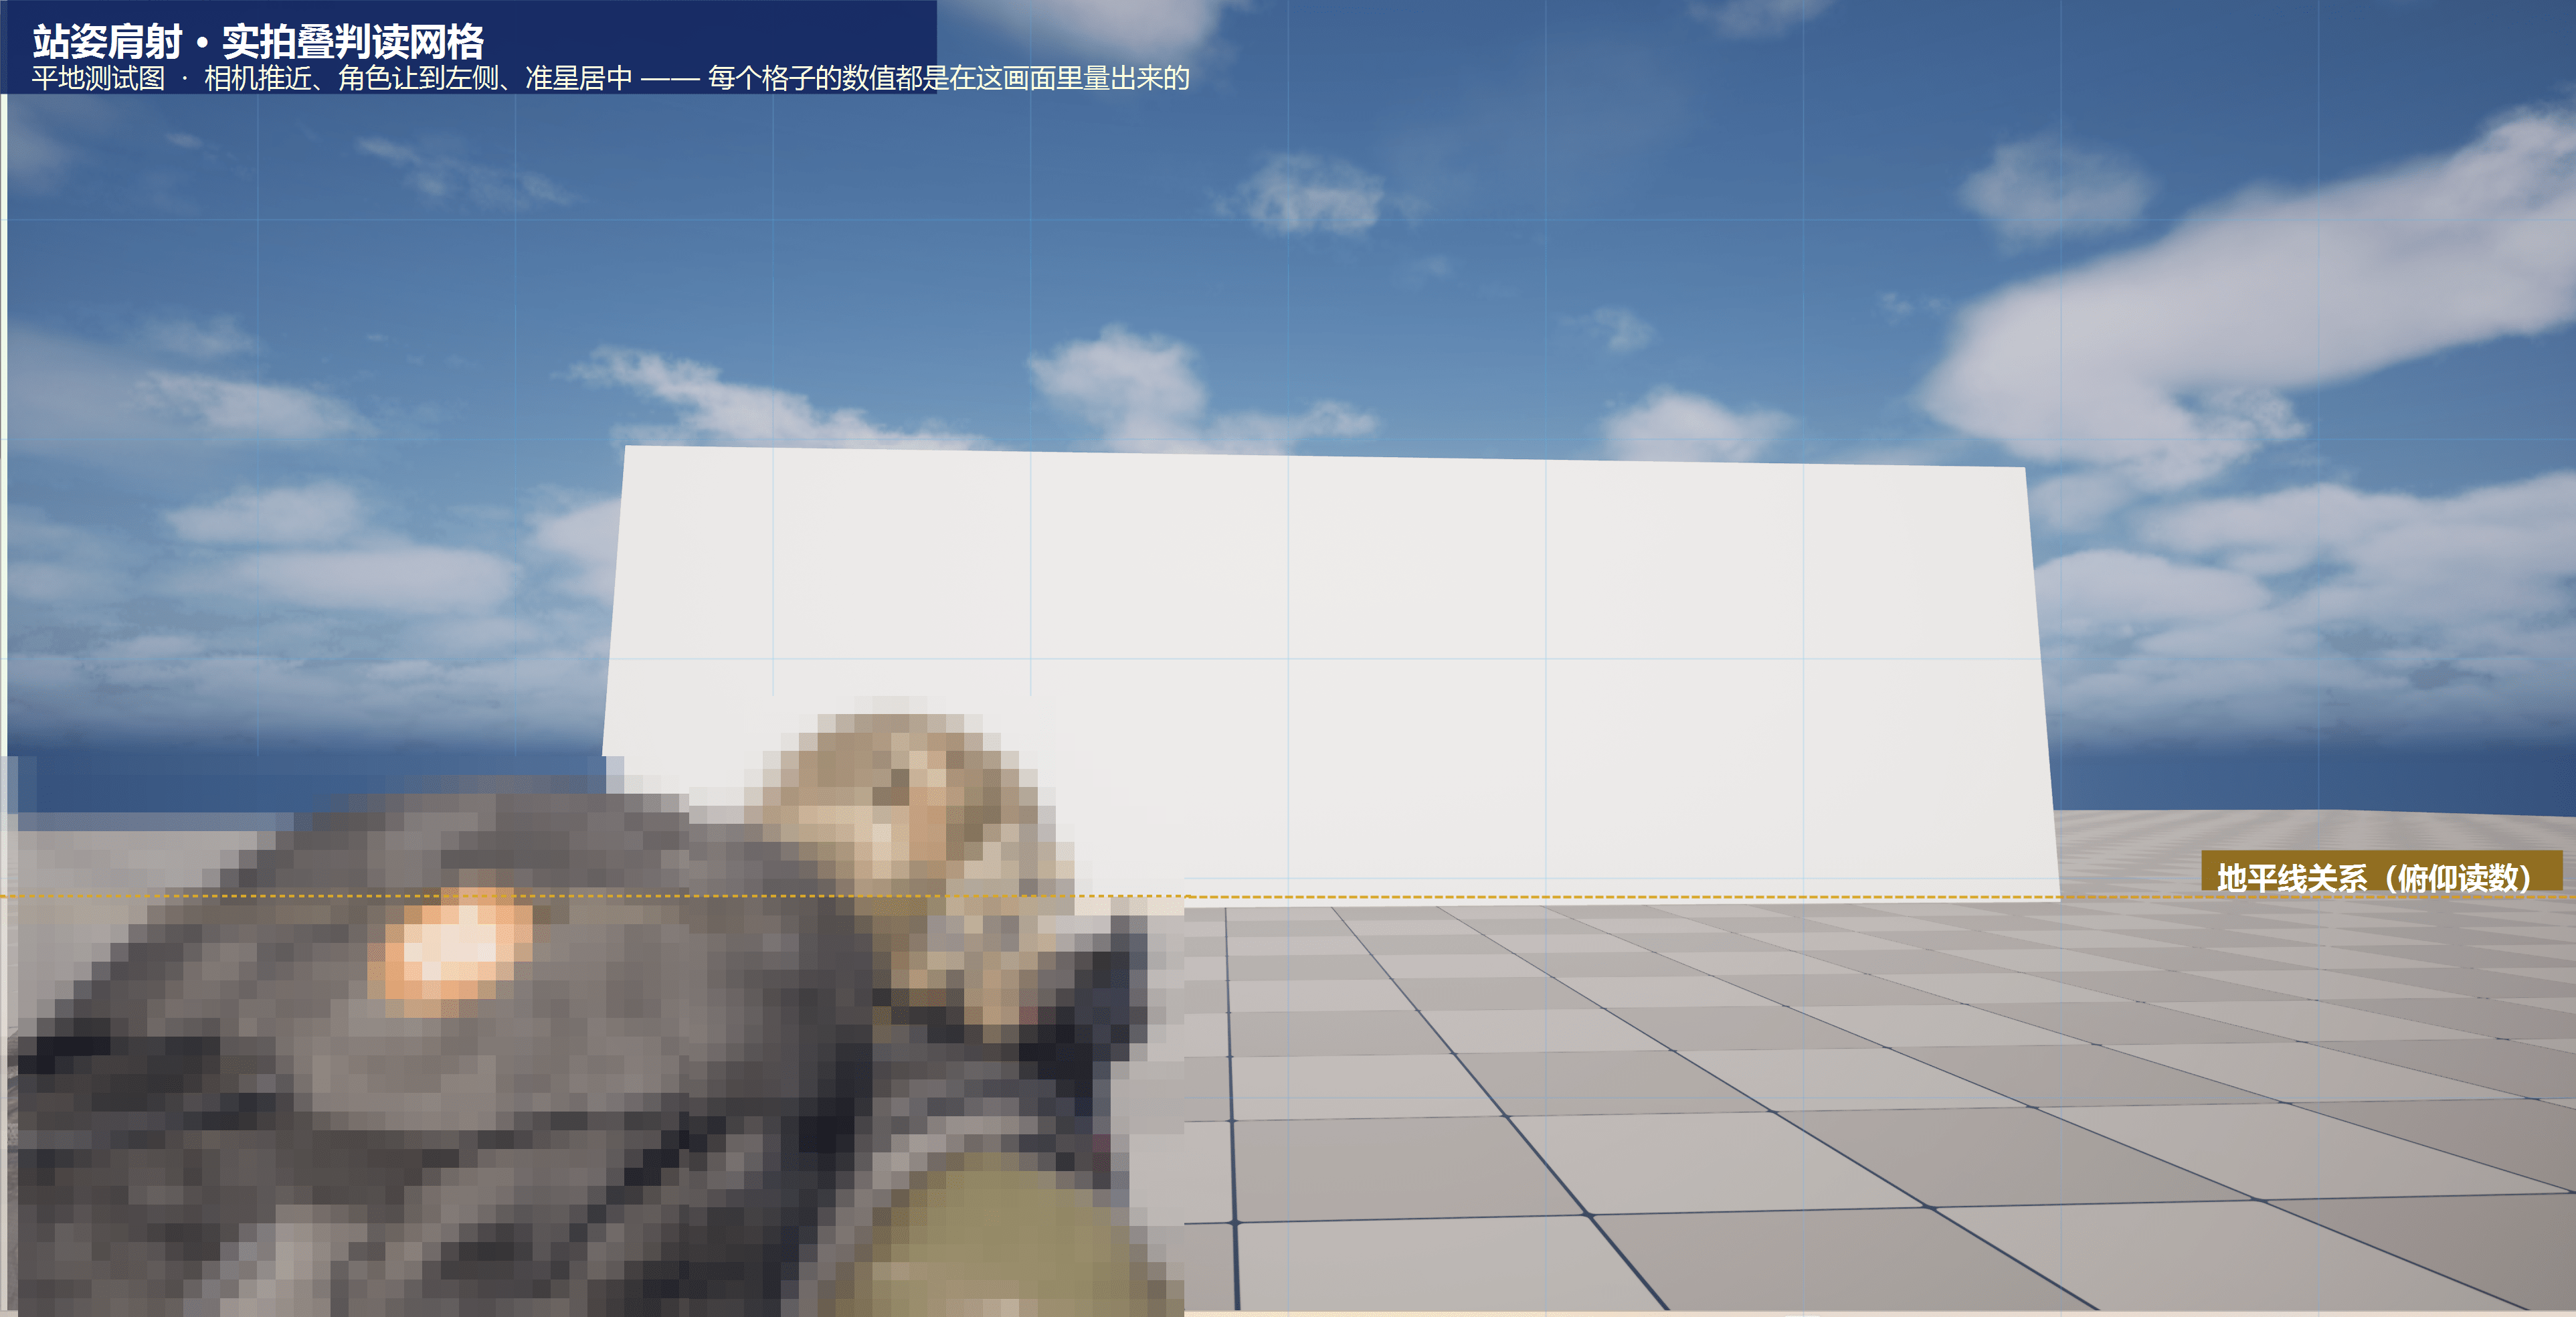


Two of the six cells were a “zero-change” surprise: the crouch and standing hip baselines — after aligning measured composition to the reference, the original values were already right, not one cell touched. Measurement finds what’s wrong and proves what’s right; the rework the latter saves is invisible income.
The other four cells each have their story; three representative ones:
Crouch shoulder: one clean run of the standard flow. This cell saw no failures, and it’s here precisely because it shows what the method looks like once mature. Lock a clean crouch-shoulder hold-frame in the reference as the target: helmet x 37%, width 9.8%, 7.5% below horizon. Dial, screenshot, grid-read, compare, fine-tune, two rounds. Final 35.3%, 9.4%, +4.4%, all within the read noise band — complete. Under an hour total, most of it spent entering and exiting the game for screenshots. Against round-one standing (the slope-contamination one) which took a whole night and still failed — same method, clean-target-or-not decides a tenfold efficiency difference. Which is why “picking the target” deserves to be its own step: judge the footage before you read it.
The crouch clamp coincidence. The finalized crouch-shoulder arm length lands exactly on the safety clamp (65 against 65) — the composited arm length runs right against the clamp. Not a mistake, a geometric coincidence: crouch is supposed to be close. But it’s a reminder: if one day you change an offset and find “it won’t move no matter what,” check whether it’s sitting on a clamp first: a blown fuse doesn’t beep, and a clamped parameter doesn’t shout either. Every “silently active” protection in a tuning system deserves a visible indicator.
Prone is the only cell that moved the baseline — and a two-parameter-coupling lesson. Version 1 only tuned arm length; dialed to the target distance and in-game the camera hugged the top of the character’s head shooting downward, like a surveillance cam. The reason: the prone look-target was still hung at the standing height: the character lay flat but the “eyes” didn’t follow down, so the camera orbits a floating point and no amount of distance-tuning escapes the top-down. Arm length and look-target height jointly decide composition; moving one dimension is finding the right point on the wrong circular orbit. The prone baseline finally moved all three parameters, landing only when matched to the reference’s “ground-level level gaze, horizon pressed to upper-middle of frame.”
The safety clamp went from one number to three. Shoulder offsets are negative (push-in), and any config error could reduce arm length to negative, sinking the camera into the character’s body. Version 1’s clamp was a single constant: arm length no lower than 80. A round of playtest showed it created a problem instead: the prone composited arm length got clamped above 80, farther than crouch, exactly opposite to the benchmark’s “the lower the posture, the closer the camera.” The reason: safe distance depends on the relative geometry of camera and character — a standing character is a vertical column, the camera must arc past head and shoulders, needing a large gap; a prone character lies flat with the camera level behind, so clipping risk is actually smallest. A single clamp value means constraining all postures by the most conservative one. The finalized form is three per-posture clamps (80/65/50), plus a usage philosophy: the clamp value is set slightly below the target arm length, because the clamp’s job is “guarding” (a backstop when parameters are misconfigured), not “shaping” (it doesn’t participate in normal composition). Once guarding logic starts shaping, tuning becomes wrestling with your own fuse.
Six cells total, two-to-four rounds each, all landed.
9. FOV: A Read Against Degeneracy
After composition closure, one residual remained: our effective field of view was a chunk wider than the reference, the wide-angle look obvious. The intuitive fix is “narrow the FOV on aim” — but first a question: does the benchmark narrow FOV on aim at all?
This is harder than it looks. An object growing on screen could mean the camera pushed in (dolly) or the FOV narrowed (zoom) — a single object’s size change is not enough to distinguish dolly from zoom: fixate on one target and its growing 2.9× can be produced identically by either cause. In the reference the helmet grows exactly 2.9× from hip to shoulder, and how much of that 2.9× is dolly versus zoom is unsolvable from the helmet alone.
The solution is a two-depth read: camera translation has almost no effect on the angular size of distant scenery (landmarks tens of meters out), but zoom scales the whole frame uniformly. Whether the distant scenery changed is the verdict on whether zoom happened — because far geometry is immune to the camera moving forward or back, it’s the cleaner witness to a true FOV change. We ran a similarity-transform fit on the distant skyline in the footage — the whole distant silhouette line of the hip frame and the shoulder frame, grid-searched for the optimal scale factor under a “scale-plus-translate about the optical center” model. Three frame pairs fitted independently, scale factor converging at 1.07–1.10: the benchmark does narrow FOV on aim, by about 5 degrees.
There’s also a “copy the absolute or copy the delta” methodology choice here. The benchmark’s base FOV differs from ours (the rig systems are wholly incomparable), so copying its absolute degrees is meaningless; but “how much narrower shoulder is than hip” — that delta — is cross-project portable: it encodes the strength of the “aim = focus” camera language, not the parameters of some specific shot. Everywhere the placement-and-framing work ports a number across projects, it follows this: absolutes anchor to your own project’s measurements; only deltas look to the reference. The composition relative-delta target, the FOV delta here — both are instances of the same principle.

The engine side then landed an FOV channel. The original intent was simple: the FOV offset eases in and out with “aim progress,” synced with the rig push-in. Version 1 used the existing “blend progress” interface: simply multiply by the offset. A review of the interface’s semantics before landing the code surfaced a serious hazard: it returns the blend’s completion progress, which stays at 1 after the blend ends — meaning it’s also 1 when standing still not aiming, and multiplying directly would apply the full narrowing to the hip default too. “Progress” and “degree” differ by one word and mean entirely different things. The right move is to make FOV a parallel scalar inside the aim-layer blender: sharing the same blend timeline and same continue logic with the rig offset, endpoints between “zero” and “the config value”: clean zero at hip, synced frame-by-frame with the rig push-in in any transition state.
Then a product decision: channel landed, off by default. The read proved the benchmark does it, but “do we want to follow” is a separate question: the call was rig-first, FOV held stable throughout, and enabling it is a matter of filling one number in the table. The function/data separation shows its decision value here for the first time: landing the mechanism and enabling the taste can be two independent calls. The read number (about 5° of narrowing) went into the table structure’s comments as a reference value, so the day it’s decided to enable, no re-archaeology needed.
10. Shoulder Swap: Code Written, Then Shelved
The last placement-and-framing cell is the shoulder swap. This cell opens with a read verdict: the swap was pushed to back-of-queue in the original requirements, because “does the benchmark have a shoulder swap” was a long-standing mystery. The clip recorded for it gave the proof: the character aims at x 62% on the right of the frame, exactly mirroring the default’s left-side 40%: the benchmark has a shoulder swap, worth doing.
The design had two non-obvious decisions. One, the mirror’s application point must be after all composition layers compose. The camera’s lateral offset has more than one source: baseline, indoor arm-pull layer, aim overlay, viewport-ratio curve all write into the Y channel. Flip only the shoulder-offset parameter and it looks swapped at hip, but the moment you aim, the aim overlay drags the camera back to the original side and the composition snaps across. The right move is: after all layers compose, at the final consumption point, multiply the lateral channel by plus-or-minus-one — the swap is a composition-level mirror, not a parameter-level one. Two, the crosshair stays centered forever: the swap moves only the camera, not the ballistics, so player muscle memory migrates at zero cost.
The bindings were a small aside: looking for a handy key for the swap, I went through the candidates — all taken. It ended up on the forward mouse side-button, and had to add a row to the key table. That “feature in ten minutes, bindings in half an hour” experience will draw a knowing smile from anyone who’s built an input system.
The code was written. Then it was shelved.
The shelving rationale: the shoulder swap serves cover engagement (swap to the left shoulder when peeking a left cover, exposing half a body less), and the project right now doesn’t even have enemies. It doesn’t out-rank the base-feel wrap-up work. So the code went whole into a feature branch, zero residue on trunk, the newly added key-table row pulled back out of the commit list, design and binding research all archived. The day cover gameplay stands up, check out the branch and keep compiling.
This is also a kind of daily reality this series wants to record honestly: not all code that gets written should get merged. Judging “do we want it now” is as important as judging “how to do it right”; what the former cuts is a futures contract on maintenance cost.
11. The Acceptance Line for Placement and Framing
Part 1’s deliverables collected in one place, and a checkable definition of “rework complete.” The placement-and-framing acceptance line is: three postures × hip/shoulder, six composition cells, each with three reads (x / width / horizon relation) all landing within the read-noise band of the reference target, and every number able to state its provenance.
| Cell | Baseline (arm/shoulder/lift) | Shoulder offset | Note |
|—|—|—|—|
| Standing | original, zero change | −121 / −18 / +14 | old derived value wrong in two directions, formula inversion two rounds to land |
| Crouch | original, zero change | −85 / −10 / −5 | standard flow two rounds, arm length against per-posture clamp |
| Prone | all three moved | −140 / +20 / −20 | the only cell moving the baseline, arm × lift coupling lesson |
Plus: per-posture safety clamps (80/65/50, guard not shape), FOV channel (read value −5° in comments, off by default), shoulder swap (design complete, shelved on a branch). Every row traces back to a specific reference frame and read record. That sentence was impossible in May; now it’s a by-product of the workflow.
12. AI Collaboration Retro (Part 1)
Per series convention, the fixed four questions.
What did AI help with? Within this post’s scope: all the code for the tuning panel and CSV pipeline (the template archaeology and the discovery-and-adoption of the pure-code precedent were also its doing); the extraction, grid overlay, and quantified reads of 385 read-frames; the modeling, constant calibration, and solving of the formula inversion; the numeric computation and landing of every round of the six composition cells: CSV edits, headless imports, cold-read verification all executed automatically, the human only looking at results in-game; the export-baseline effort for the project’s 1,300-odd tables; and the archive running throughout: every batch written into a shared archive as it’s done, so any session interruption lets the next session pick up from the exact point with one sentence.
Where did AI go wrong? Three representative times. One, the absolute composition target contaminated by slope: AI “converged within band” on the numbers with no awareness, and hoisted the camera to an obviously unreasonable height — AI executes a wrong reference frame with great precision, and errors at the reference-frame layer it can’t find itself; two human eyeball vetoes caught it. Two, the tuning panel’s number field was made too narrow, the minus sign clipped, “15.0” actually “−15.0,” and reading the panel screenshot AI nearly finalized the negative as positive, caught in the end by inverting from composition physics (this parameter positive should move the helmet up, but the frame clearly shows it moving down). Three, a table read matched a weapon ID by row name and came up empty, nearly declaring on the spot “this gun has no config,” when in fact that table keys on a different field and the row name is just a note. All three errors share one shape: flawless at the execution layer, wrong at the reference-frame / semantic layer, and wrong with great confidence.
How did humans fill in? Three kinds of irreplaceable moves. Eyeball veto: when the numbers say “landed” and the eyes say “wrong,” the eyes win — both times they won correctly. Taste calls: FOV off, swap shelved, the final “looks right” confirmation of each composition cell, and scoping calls like “rig-first” — all human judgment. Physical-in-loop: all compilation and in-game validation are human-executed, and every AI batch is forced to stop at a “waiting for playtest” checkpoint. That rhythm is a quality mechanism: two of the three errors in this post were caught right there.
How was it finally resolved? Each error deposited a reusable rule: absolute target swapped for relative-delta target (terrain elimination); when a read is in doubt, cross-verify with physical relations, an instrument reading is not to be fully trusted; check a table’s key definition before drawing a conclusion. These rules, along with all finalized values, read methods, and failed attempts, went into the long-term archive. This is the highest-compounding link in “AI-native”: when the next production line starts, these lessons are free — they don’t evaporate when a session ends, nor depend on any one person’s memory.
*Part 2 preview: the temporal domain (transitions and timing): the per-frame audit of transition timing, the base-layer leak behind ADS’s bidirectional hard cut, the “structural death” and revival of follow lag, the four-layer configuration chain of fire feedback, and the reading-toolkit evolution that ties it all together.*